Your iPhone stores thousands of precious memories, but keeping them only on your phone risks losing them forever. Transferring photos to your laptop creates a secure backup, frees up iPhone storage, and lets you edit images on a bigger screen.
This guide covers every method to move photos from your iPhone to any laptop. Whether you use Windows or Mac, prefer cables or wireless transfers, and want to use iTunes or skip it entirely, we’ve got you covered with simple step-by-step instructions.
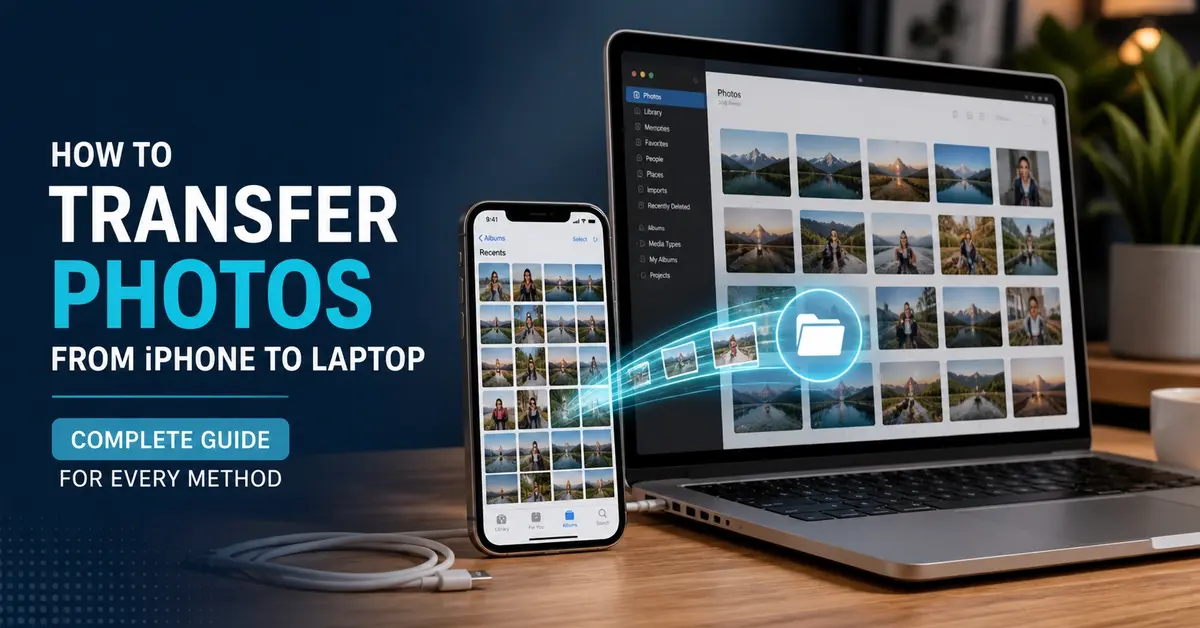
How to Transfer Photos from iPhone to Laptop
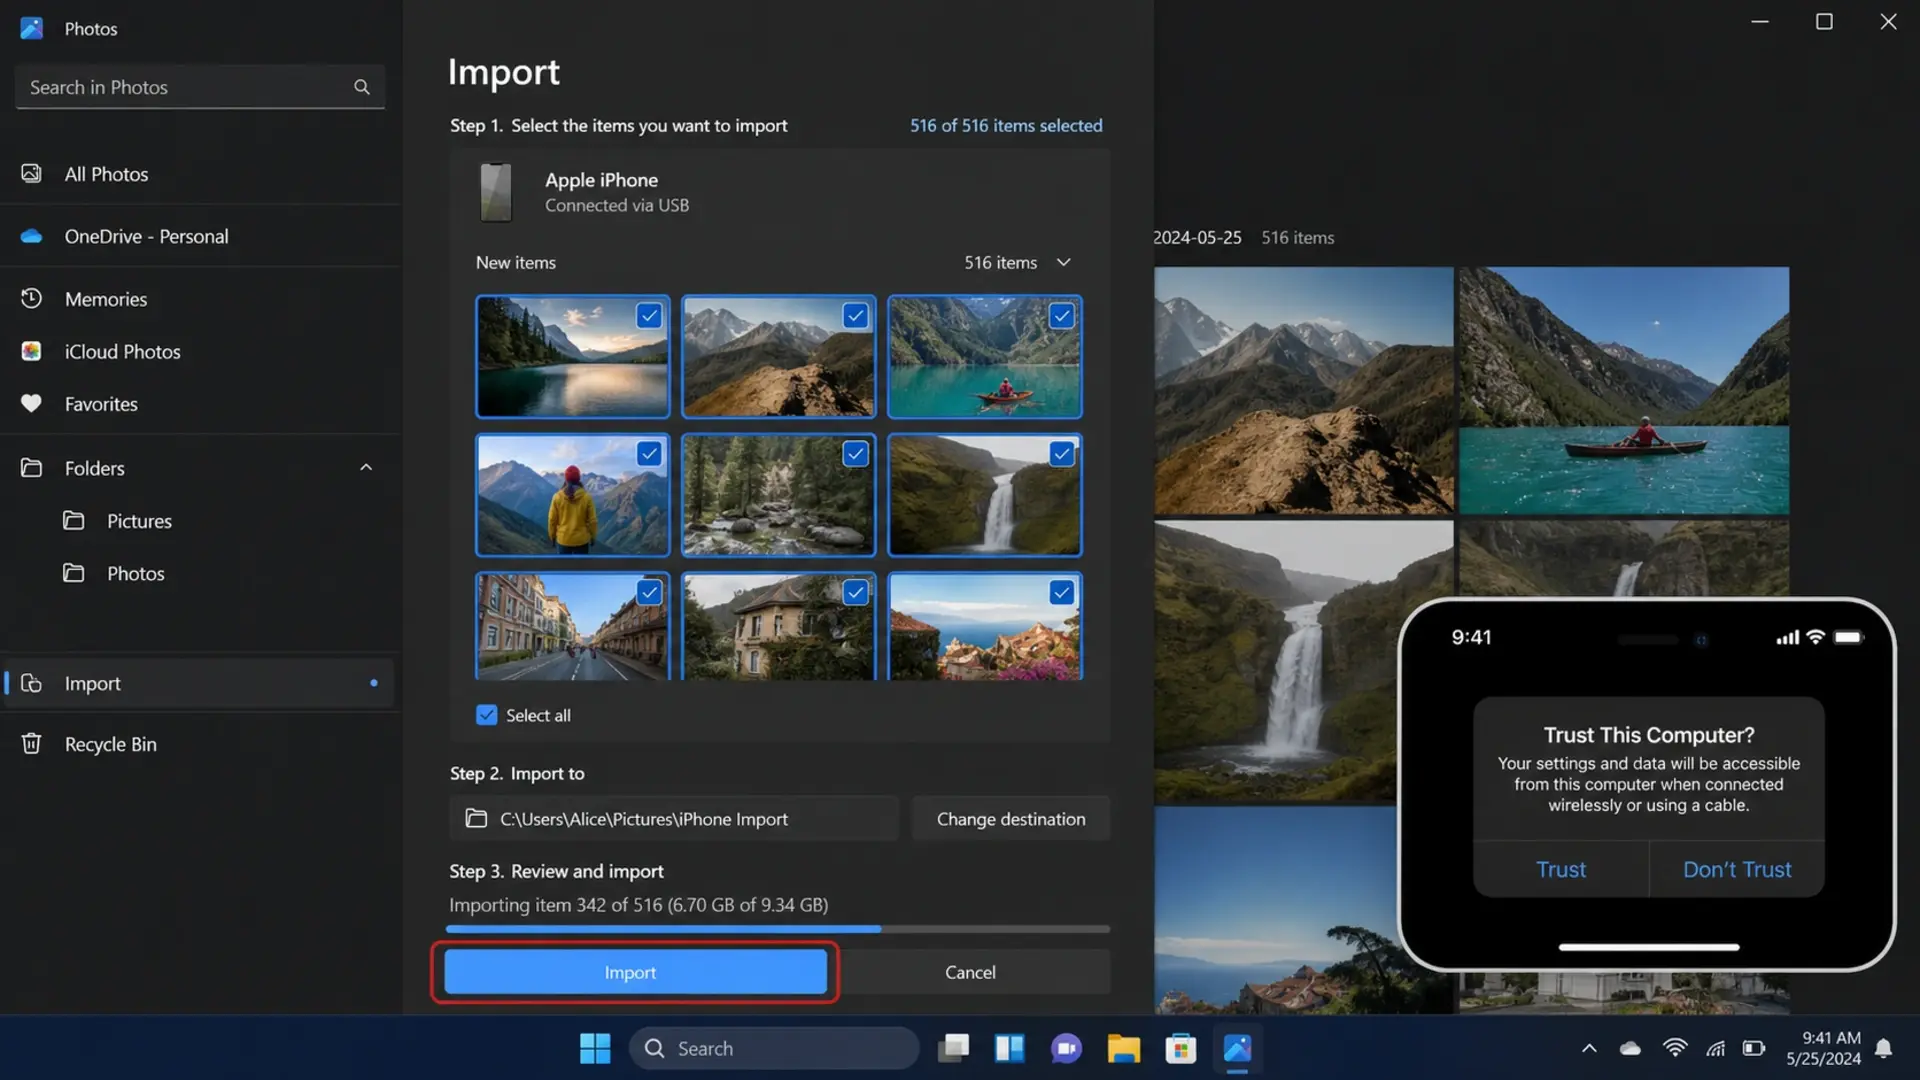
Connect your iPhone to your laptop using a USB cable, then open the Photos app (Windows) or Image Capture (Mac) to import your pictures directly. This method works fastest and requires no Internet connection.
Here’s the Quick Process for Windows:
- Connect the iPhone to the laptop with a Lightning or USB-C cable
- Unlock your iPhone and tap “Trust This Computer” when prompted
- Open the Photos app on Windows
- Click Import > From a connected device
- Select the photos you want to transfer
- Choose where to save them and click Import
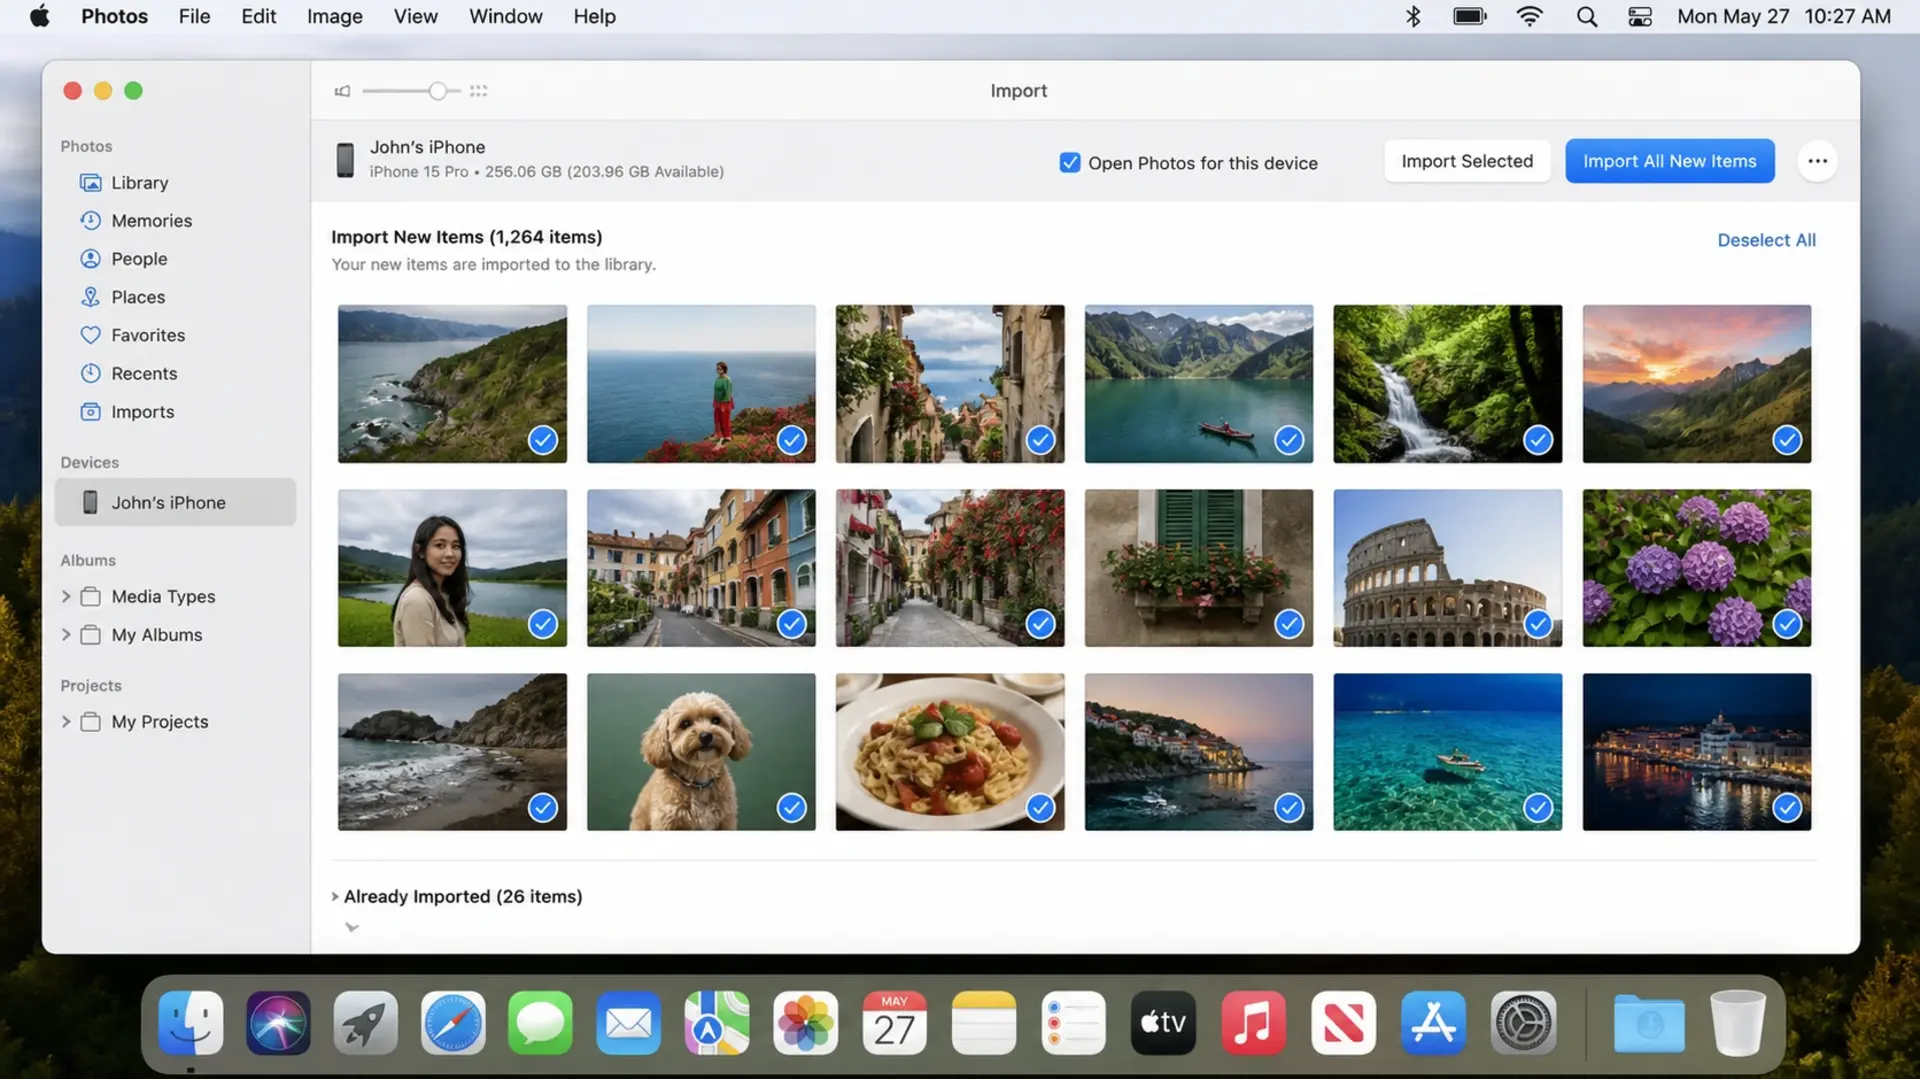
For Mac Users:
- Connect the iPhone using the cable
- Open Photos app (or Image Capture for more control)
- Your iPhone appears in the sidebar
- Select photos and click Import
This direct cable method transfers photos at full resolution without compression. It works even when WiFi is unavailable and handles thousands of photos efficiently.
How to Transfer Photos from iPhone to Laptop via USB
USB transfer remains the most reliable method for quickly moving large photo libraries. Connect your iPhone to your laptop with a cable, then follow these detailed steps.
Windows USB Transfer
- Plug your Lightning or USB-C cable into both devices
- Unlock your iPhone
- Tap “Trust” on the pop-up asking to trust this computer
- Enter your iPhone passcode to confirm
- Open File Explorer on Windows
- Find “Apple iPhone” under This PC
- Navigate to Internal Storage > DCIM
- Open folders to find your photos (named with dates)
- Copy photos and paste them into your desired folder
Mac USB Transfer
- Connect the cable between the iPhone and the Mac
- Open Finder (macOS Catalina or later) or iTunes (older macOS)
- Select your iPhone from the sidebar
- Click the Photos tab
- Check “Sync photos to your device.”
- Choose which albums to transfer
- Click Apply
USB transfers work without an Internet connection and transfer files at maximum speed. Your laptop’s USB port type affects transfer speed: USB 3.0 ports transfer faster than USB 2.0 ports.
How to Transfer Photos from iPhone to Laptop Wirelessly
Use iCloud Photos to sync images automatically between your iPhone and laptop without any cables. This method keeps your library updated continuously.
Setting Up iCloud Photos on iPhone
- Open Settings > tap your name at the top
- Select iCloud > Photos
- Turn on “Sync this iPhone.”
- Choose “Download and Keep Originals” for full quality
Accessing iCloud on a Windows Laptop
- Download iCloud for Windows from the Microsoft Store
- Sign in with your Apple ID
- Check the “Photos” option
- Click “Options” next to Photos
- Enable “iCloud Photos.”
- Apply changes
Your photos now sync automatically to the iCloud Photos folder on your laptop. New photos appear without manual transfers.
Using iCloud.com
Don’t want to install software? Access your photos through any browser:
- Go to iCloud.com
- Sign in with Apple ID
- Click Photos
- Select the images you want
- Click the download icon
This wireless approach works great when you’re away from your usual laptop or using someone else’s computer temporarily.
How to Transfer Photos from iPhone to Windows 10 Laptop
Windows 10 includes built-in tools that make transferring iPhone photos straightforward.
Using Windows Photos App
- Connect the iPhone via USB cable
- Open the Photos app from the Start menu
- Click the Import button (top right)
- Select “From a connected device.”
- Wait for Windows to scan your iPhone
- Check the photos you want to import
- Click “Import selected” or “Import all.”
Using the File Explorer Method
- Connect the iPhone to the Windows 10 laptop
- Open File Explorer
- Click “This PC” in the sidebar
- Double-click “Apple iPhone.”
- Open “Internal Storage”
- Open the “DCIM” folder
- Browse dated folders containing your photos
- Select, copy, and paste to your preferred location
Windows 10 sometimes fails to properly detect iPhones. If this happens, try a different USB port, restart both devices, or update iTunes drivers.
If your laptop runs slowly during transfers, background processes may be causing the issue. Check our guide on how to fix a laptop battery that drains fast; the same fixes also improve overall system performance.
How to Transfer Photos from iPhone to Laptop Without iCloud
Not everyone wants their photos on Apple’s cloud servers. Several methods let you transfer photos from an iPhone to a laptop without iCloud storage.
Direct USB Cable Transfer
The File Explorer method described above bypasses iCloud completely. Your photos move directly from iPhone to laptop storage without touching any cloud service.
Using Third-Party Apps
Apps like iMazing, AnyTrans, and Dr.Fone offer more control than Apple’s built-in options:
- Download and install your chosen app
- Connect the iPhone via USB
- Select Photos section
- Browse and select images
- Export to your laptop
Email or Messaging Apps
For small batches of photos:
- Open Photos on iPhone
- Select images (up to 20-30 at once)
- Tap the Share button
- Choose Mail or WhatsApp
- Send to yourself
- Download from email or WhatsApp Web on a laptop
Using Google Photos
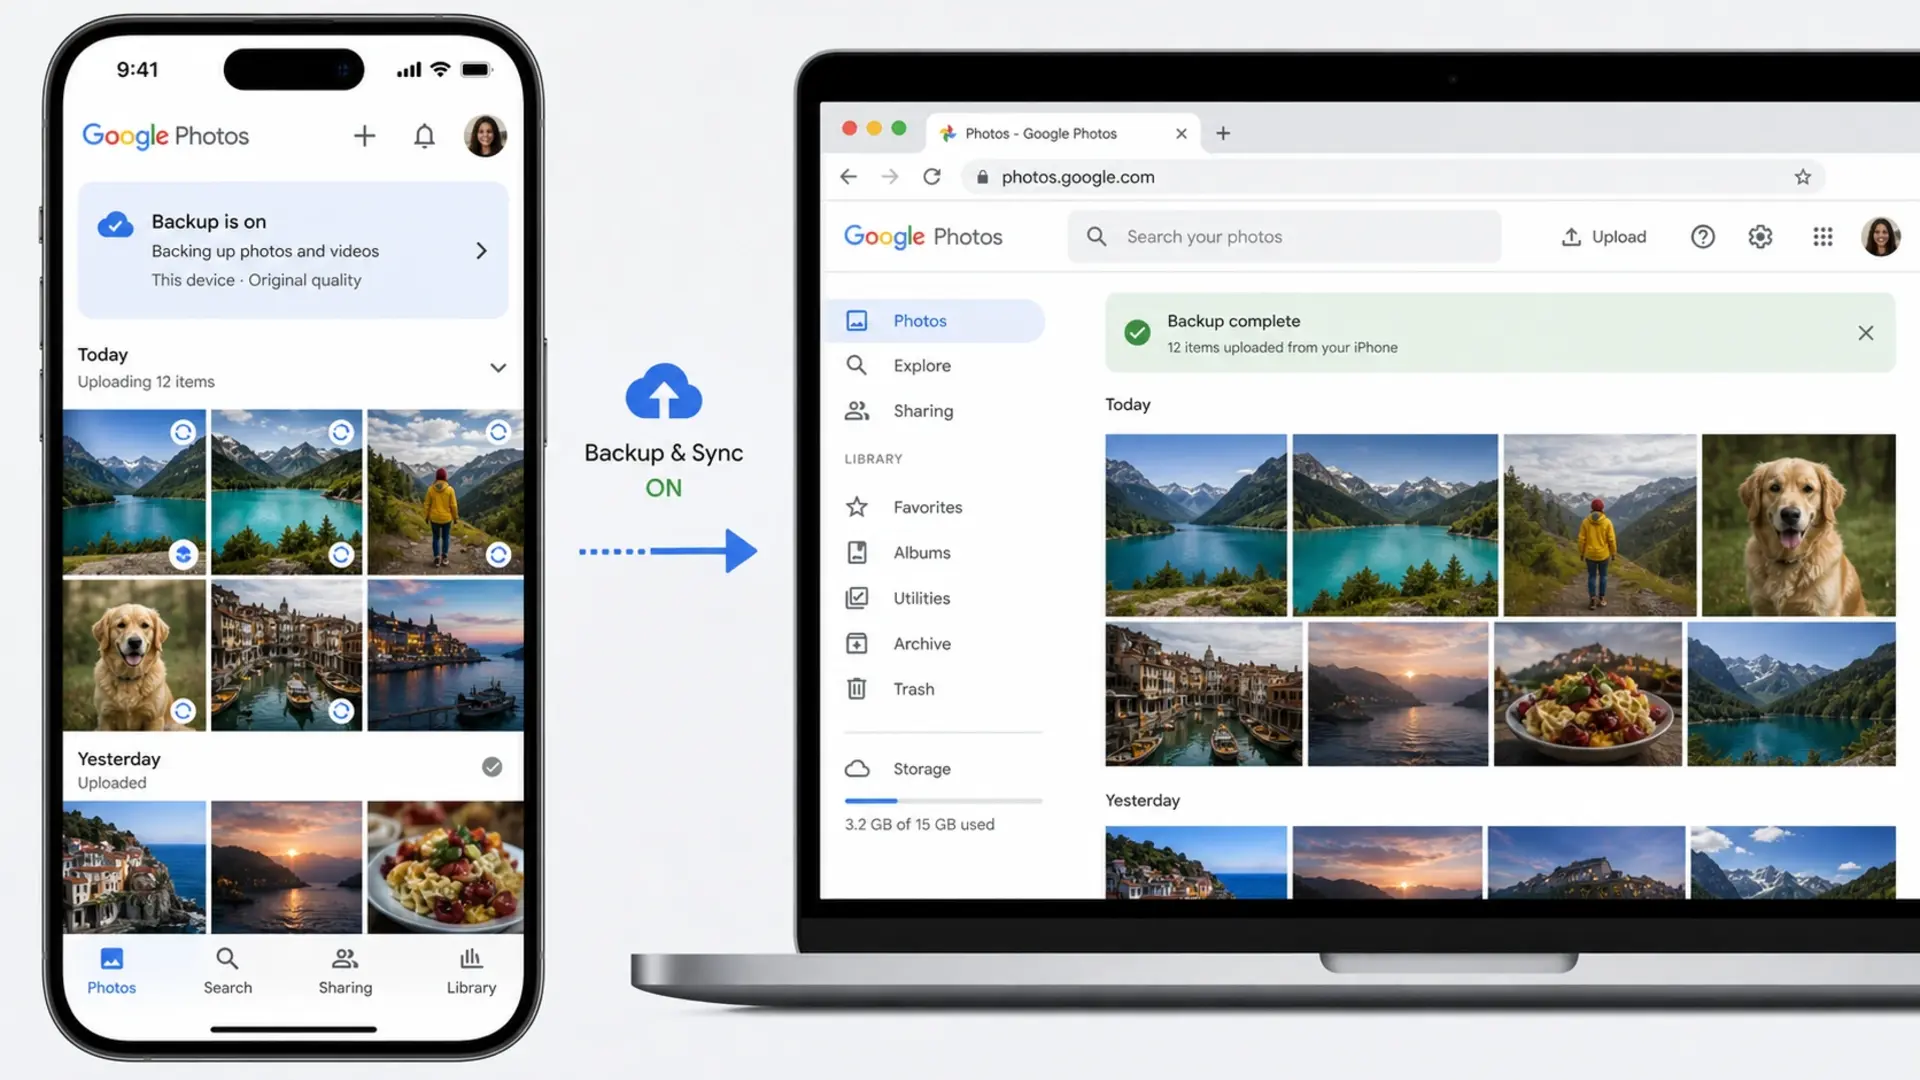
- Install the Google Photos app on iPhone
- Sign in with a Google account
- Enable backup
- On a laptop, visit photos.google.com
- Download photos from your library
How to Transfer Photos from iPhone to Laptop Using iTunes
iTunes provides another transfer method, though Apple has shifted away from it in recent years.
Transfer Photos via iTunes Sync.
- Install the latest iTunes on Windows
- Connect the iPhone with the USB cable
- Click the device icon when it appears
- Select Photos in sidebar
- Check “Sync Photos”
- Choose a folder to sync from
- Click Apply
Note that iTunes sync primarily transfers photos TO your iPhone from your laptop. For transferring FROM iPhone to laptop, the Photos app or File Explorer methods work better.
iTunes Backup Method
- Connect the iPhone to iTunes
- Click “Back Up Now”
- Your photos are saved as part of the backup
- Use third-party tools to extract photos from backup if needed
iTunes backups store photos in an encrypted format, making direct access difficult. This method is better suited to full device backups than to quick photo transfers.
How to Transfer Photos from iPhone to Laptop with Cable
Cable transfers offer the fastest and most reliable way to move large photo libraries.
What Cable Do You Need?
- iPhone 14 and earlier: Lightning to USB-A or Lightning to USB-C cable
- iPhone 15 and later: USB-C to USB-C or USB-C to USB-A cable
Use Apple-certified cables for reliable connections. Cheap third-party cables sometimes fail to transfer data, only charging your device instead.
Maximizing Transfer Speed
Transfer speed depends on your cable quality and your laptop’s USB ports. USB 3.0 ports (usually blue inside) transfer much faster than USB 2.0 (black or white inside). USB-C ports generally offer the best speeds.
For transferring thousands of photos, connect to your laptop’s fastest USB port and Close unnecessary applications to ensure smooth transfers.
How to Transfer Photos from iPhone to Mac Laptop
Mac users enjoy seamless integration between iPhone and MacBook thanks to Apple’s ecosystem.
Using AirDrop (Wireless)
- Enable WiFi and Bluetooth on both devices
- Open Photos on iPhone
- Select images to transfer
- Tap Share > AirDrop
- Select your Mac from the available devices
- Accept transfer on Mac
- Photos save to the Downloads folder
AirDrop works brilliantly for quick transfers of smaller batches. For thousands of photos, cable methods remain faster.
Using Photos App on Mac
- Connect the iPhone via cable
- Open the Photos app
- iPhone appears in the sidebar under Devices
- Click Import All or select specific photos
- Import photos to your Mac library
Using Image Capture
Want more control over where photos save?
- Connect iPhone to Mac
- Open Image Capture (search in Spotlight)
- Select your iPhone from Devices
- Choose the destination folder at the bottom
- Select photos and click Download
View your transferred photos on a larger display by learning how to connect an external monitor to a laptop for a better editing and viewing experience.
Transfer Photos from iPhone to HP Laptop.
HP laptops run Windows, so standard Windows methods apply. Here’s the specific process for HP users.
HP Photos App Method
- Connect the iPhone using the USB cable
- Tap “Trust This Computer” on iPhone
- Open the Windows Photos app
- Click Import > From a connected device
- Select your photos
- Choose the HP laptop folder as the destination
- Click Import
HP File Explorer Method
- Connect the iPhone to the HP laptop
- Open File Explorer
- Navigate to This PC > Apple iPhone > Internal Storage > DCIM
- Copy desired photos
- Paste to your HP laptop’s Pictures folder or chosen location
HP laptops sometimes need updated Apple drivers for proper iPhone detection. If your HP doesn’t recognize your iPhone, install iTunes, which includes the necessary drivers.
Transfer Photos and Videos from iPhone to Laptop
Video transfer using the same methods as photos, but requires more attention due to larger file sizes.
Tips for Video Transfers
- Use cable transfers for large video files
- Ensure sufficient storage space on the laptop
- Close other applications during transfer
- Videos in DCIM folders have .MOV or .MP4 extensions
Handling HEVC Videos
iPhones record video in HEVC format by default. Windows might not play these without additional codecs. Either:
- Install HEVC Video Extensions from the Microsoft Store
- Change iPhone settings to record in a compatible format (Settings > Camera > Formats > Most Compatible)
Videos consume significant storage. Check how long your laptop battery should last to ensure you have enough power for lengthy transfer sessions.
How to Transfer Photos from iPhone X to Laptop
iPhone X uses the same transfer methods as other iPhones. The only consideration is the Lightning port, which requires Lightning-to-USB cables.
iPhone X Specific Steps
- Use a Lightning to USB-A or Lightning to USB-C cable
- Connect to the laptop
- Trust the computer when prompted
- Use Photos app, File Explorer, or iCloud
The iPhone X supports wireless transfers via AirDrop (on Mac) or iCloud. All methods described in this guide work identically for iPhone X.
Troubleshooting Common Transfer Problems
iPhone Not Detected
- Try a different USB cable.
- Use another USB port.
- Restart both devices
- Install or update iTunes on Windows.
- Check that the iPhone is unlocked during connection.
Transfer Stuck or Slow
- Close unnecessary applications
- Disconnect other USB devices.
- Transfer in smaller batches
- Check laptop storage space.
Photos Missing After Transfer
- Check DCIM subfolders: photos spread across multiple dated folders.
- Ensure you selected all photos during import.
- Look in the Downloads, Pictures, or iCloud Photos folders.
Trust Popup Not Appearing
- Disconnect and reconnect the iPhone.
- Reset Location & Privacy settings on iPhone (Settings > General > Transfer or Reset iPhone > Reset > Reset Location & Privacy)
- Try a different cable
If your laptop’s fan runs loudly during transfers or heavy processing, it might be overheating. Learn how to stop laptop fan noise for quieter operation.
Frequently Asked Questions
What is the easiest way to transfer photos from an iPhone to a laptop?
The easiest way to transfer photos from an iPhone to a laptop is to connect via USB cable and use the Windows Photos app’s import feature. Plug in your iPhone, open Photos, click Import, and select your images.
Why can’t I transfer photos from my iPhone to my laptop?
Common reasons include: an untrusted computer connection (tap “Trust” on iPhone when prompted), a faulty USB cable (try Apple-certified cables), outdated drivers (install iTunes on Windows to get Apple drivers), a locked iPhone screen (unlock during transfer), or insufficient laptop storage space.
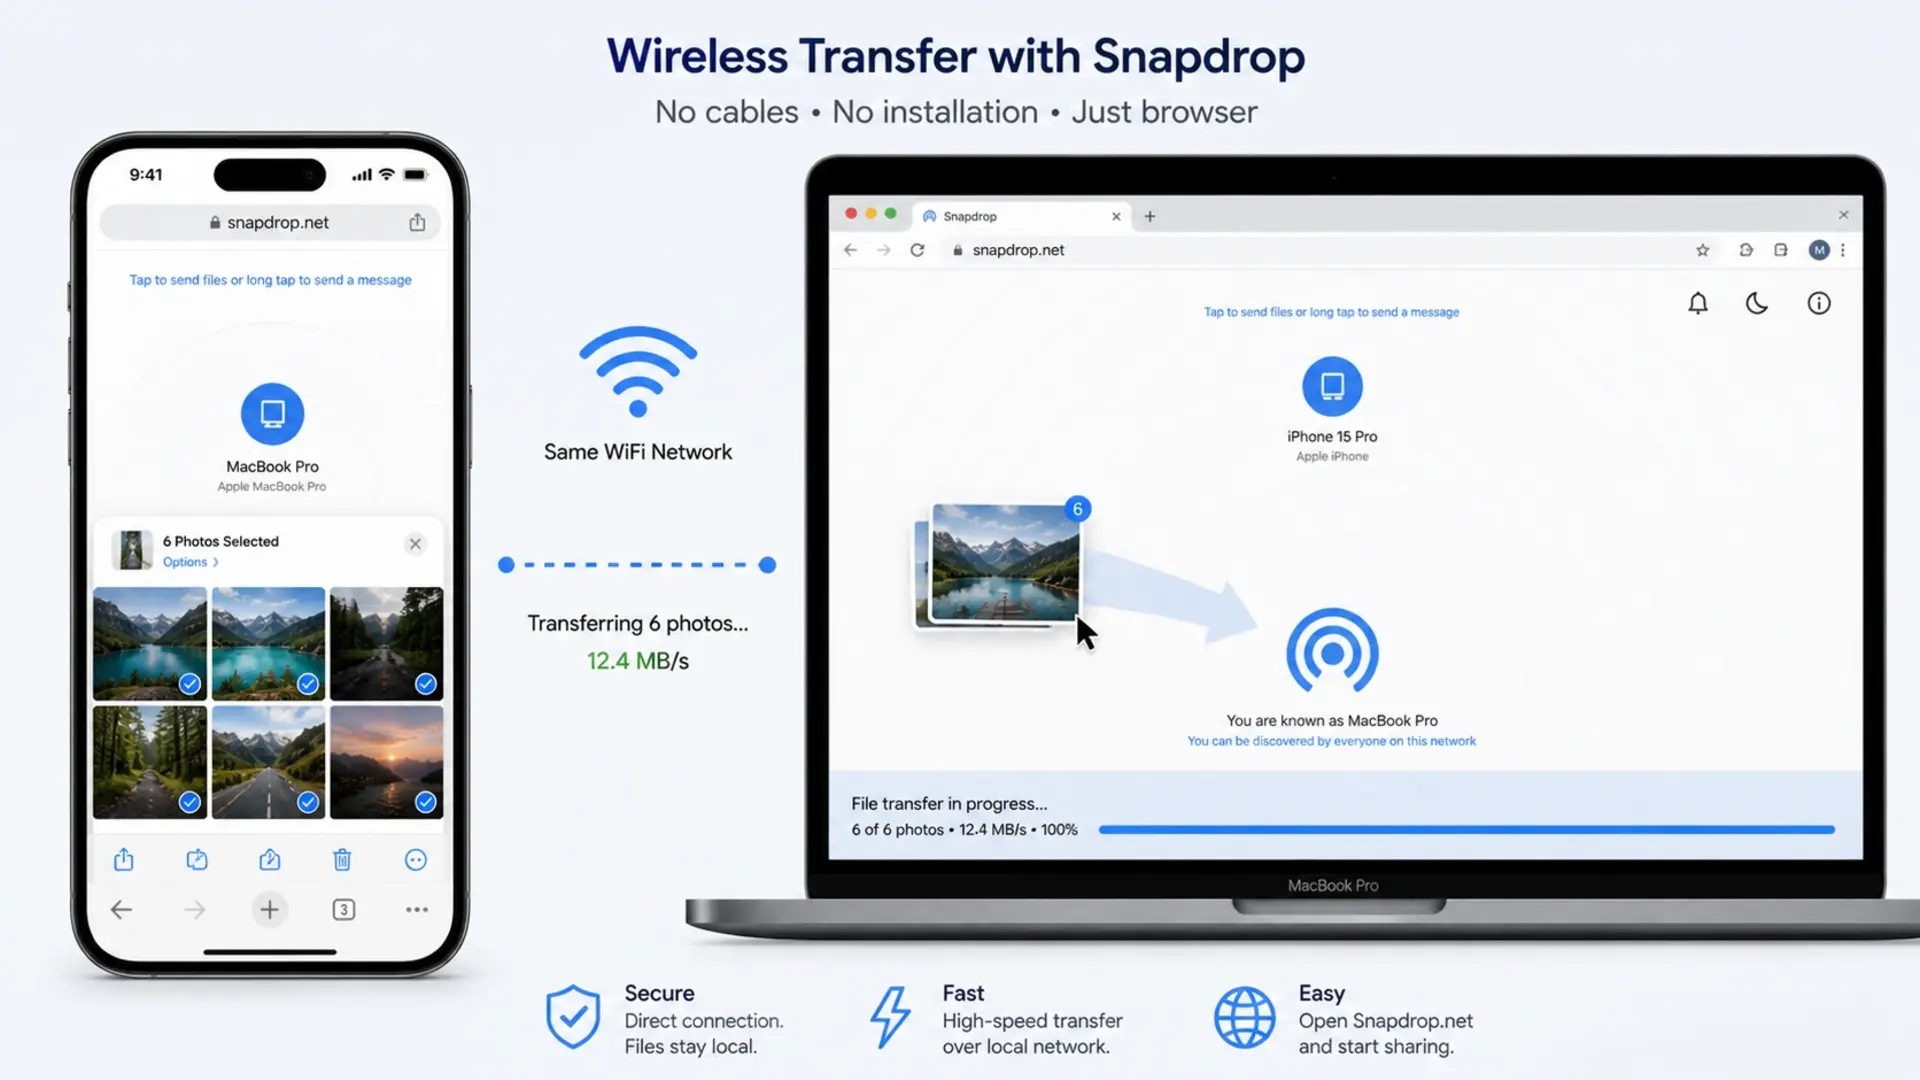
Can you AirDrop to a PC?
No, AirDrop only works between Apple devices, like iPhones, iPads, and Macs. Windows PCs cannot receive AirDrop transfers. For wireless transfers to Windows laptops, use iCloud Photos, email, cloud services like Google Photos or Dropbox, or apps like Snapdrop that mimic AirDrop functionality through your web browser.
How do I transfer 1000 photos from my phone to my laptop?
For transferring 1000+ photos, use a USB cable connection rather than wireless methods. Connect your iPhone, open File Explorer, navigate to the DCIM folder, select all photos with Ctrl+A, and copy them to your laptop.
Need Help with Your Laptop?
Tech Point Zone stocks laptops from all major brands with fast USB ports and ample storage for your photo library. Visit our Bur Dubai showroom for expert advice on choosing the right laptop for your needs.
WhatsApp us at +971 525696022 or browse our collection at techpointzone.com.